zendit Product Demo
Before you install your eSIM you’ll need to make sure you have:
On iOS 14 and later, Open Settings, then select General and finally About.

If your device is currently locked to a specific carrier, you can contact your mobile phone provider to check if it can be unlocked.
Devices purchased directly from Apple and not through a carrier’s promotion will be unlocked.
If you have remaining payments on the device to your carrier (e.g. T-Mobile) you will not be able to get your device unlocked until it is paid in full to the carrier.
Aside from inserting a valid SIM card, you can try calling the current carrier to confirm the locked/unlocked status.

Please head to your phone application and open up the dialer.

Go to your dialer app and type *#06#

A popup window will come up with your device information.

If you see “EID” in this window, then your phone supports eSIM
Installation via the QR Code is the easiest way to get an eSIM installed.
There are 2 options for installing the QR Code on Apple iPhone/iPad devices
If you are on a device using iOS 17 or later, and have the QR Code on screen, you can still activate with the QR Code by taking a screen shot of the QR Code and saving the photo on your phone (Volume Up and Power button pushed simultaneously.)
Go to “Settings” -> “Cellular” -> “Add eSIM” -> “User QR Code” and toward the bottom of the screen select “Open Photos”
Select the screen shot you took of the QR Code and you continue the process from Step 2.
If you are unable to scan the QR Code, and aren’t using iOS 17 or later to use the screenshot/photo method, the Manual install can be used.
Go to “Settings”->”Cellular”->”Add eSIM” -> “Use QR Code” then select “Enter Details Manually” at the bottom of the screen.
In the SM-DP+ Address, enter the SM-DP+ Address that was included with your eSIM details.
In the Activation Code, enter the Activation Code that was included with your eSIM details.
Select “Next” and then wait up to 10 minutes for the eSIM to install and activate, then select “Done”.
Proceed to Step 3
After scanning the QR Code, an Activate SIM screen will appear. Select “Continue” and allow up to 10 minutes for the eSIM to install and activate on the device. When it’s finished, press “Done” and your device will be setup and ready to use the eSIM.
After the eSIM is installed and activated, you have the option to give the eSIM a label. If you have multiple eSIMs installed on your device you will not be able to create a custom label for the eSIM.
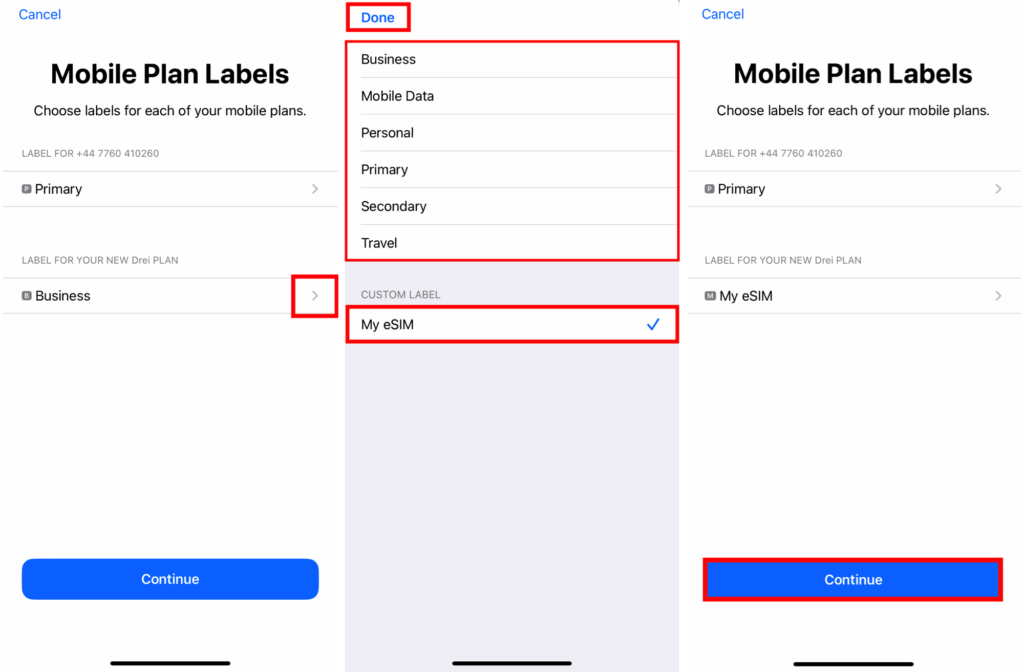
If you don’t want to label your eSIM with a custom value tap “Continue” and proceed to step 4.
If you would like to give your eSIM a custom label, press the > next to the eSIM and select from one of the preset labels or type in your own custom label. When you are satisfied with your label, Press the “Done” button and then “Continue” on the list of eSIMs.
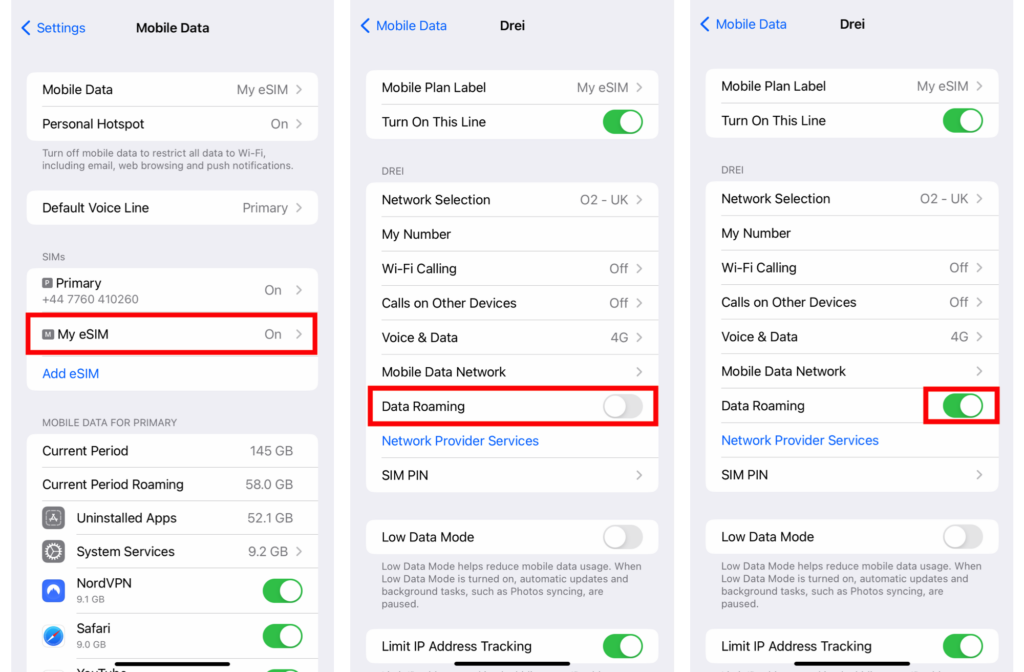
Configure your Primary and eSIM settings.

Note: If you have purchased a plan with data roaming outside your destination and you don’t wish your plan to begin immediately, select Primary for Mobile Data and then follow the instructions in Step 5 when you are ready to begin using your eSIM.
Allowing Mobile Data Switching will allow your device to switch between your primary data plan and the eSIM data plan depending on coverage. If you do not wish data to fall back on your primary plan while roaming, set Allow Mobile Data Switching to off.
When you are ready to start using your eSIM, you’ll need to turn the eSIM on and set data roaming to on.
Installation via the QR Code is the easiest way to get an eSIM installed.
There are 2 options for installing the QR Code on Apple iPhone/iPad devices
If you are unable to scan the QR Code, you can manually set it up. Go to Go to “Settings”->”Connections”->”SIM Manager” -> “Add eSIM” and the QR Code reader will open. Toward the bottom of the screen select “Enter Activation Code” and then select “Enter Manually” and follow the on screen guide to enter the details.
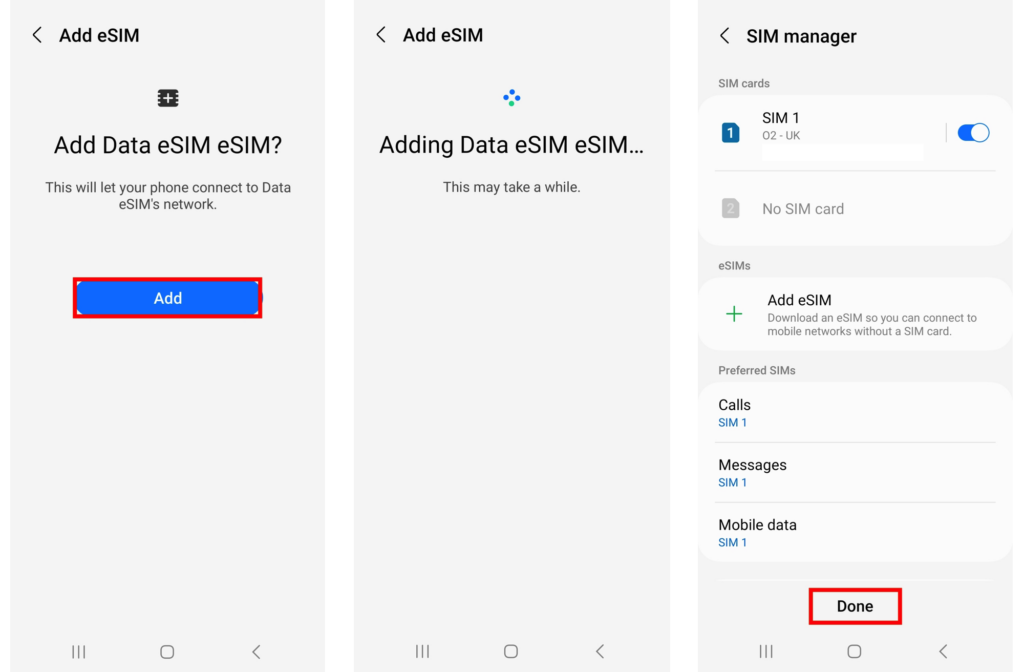
After scanning the QR Code, an “Add Data eSIM” screen will appear.
Select “Add” and allow up to 10 minutes for the eSIM to install and activate on the device.
When it’s finished, press “Done” and your device will be setup and ready to use the eSIM.
When you are ready to use your eSIM setup the eSIM settings to turn it on and activate data roaming.


Read more

Setting up your dashboard with how you want to view your data is easy with zendit learn how to customize it.

zendit supports 2 types of widgets: Transaction & Product Widgets and System Performance Widgets.

The zendit catalog consists of several sections that offer a variety of products for different purposes.

Get alerts to stay informed about upcoming promotions, catalog updates, security updates to a client environment, system outages and webhook failures.

Wallets in zendit serve as storage for funds used to purchase offers

Invite and manage users to your account
We’re here to help, please either use our contact us form or send us an email.
Contact Us Send us an email